Perfect Whitening Kit Review
The Perfect Whitening Kit is another very well known whitening product on the Australian market.
With its sleek and stylish appearance, the Perfect Whitening brand is definitely a head-turner. Coupled with a collection of products on offer, they’ve got you covered!
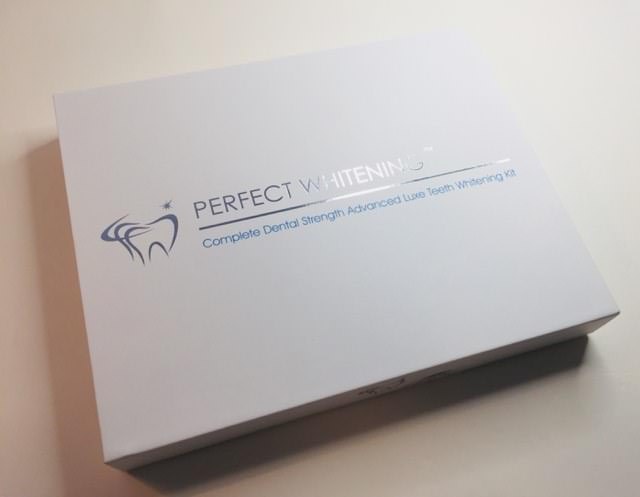
The Perfect Whitening Luxe Teeth Whitening Kit
A quick note – This isn’t a paid or sponsored post. We ordered and paid for this kit ourselves to do this review.
Full Review
Perfect Whitening strives to provide their customers with a complete professional and dental strength teeth whitening kit.
The kit is presented in a very sleek and stylish box and has all the items needed to succeed for a whiter smile.
We inspect this whitening kit and check out the packaging, ingredients, instructions, price and value as well as give you our impression of the kit in general.
Let’s take a detailed look at Perfect Whitening’s Luxe professional teeth whitening kit.
Packaging and What’s Inside
The Perfect Whitening kit comes in a very sleek and modern white cardboard box.
With beautiful reflective text on the front saying, “Perfect Whitening TM”. It then lists details about the kit.
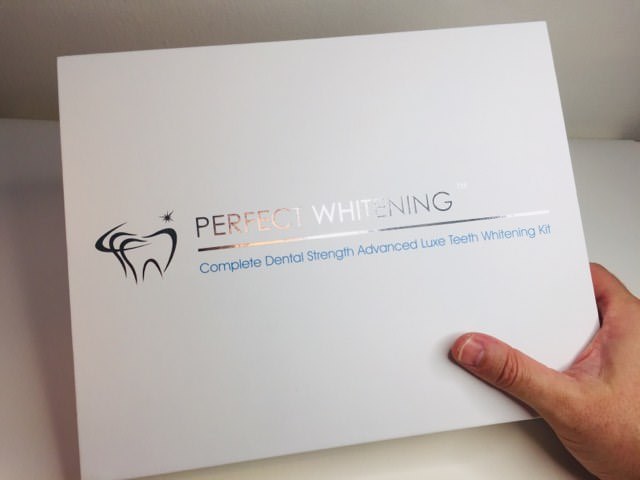
In my hands, the modern-looking Teeth Whitening kit by Perfect Whitening
We are reviewing the Complete Dental Strength, Advanced Luxe Teeth Whitening Kit.
The logo stands out when you first pick up the product, two teeth with a star on top.
The back of the box has some information about who and what it is designed for.
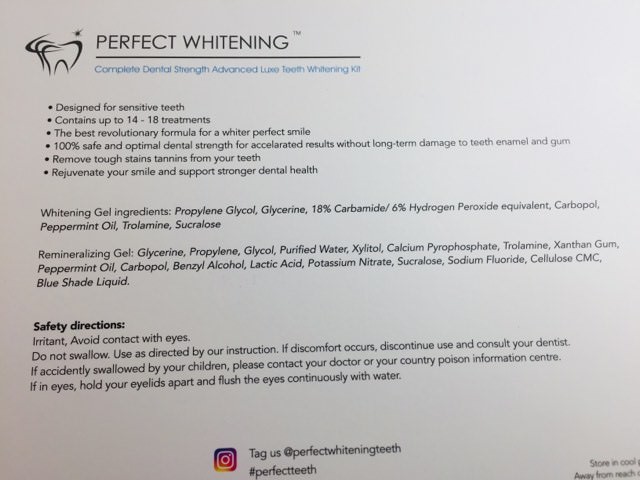
Details on the back are presented in a clear way
People with sensitive teeth will be happy as it confirms it’s designed for sensitive teeth and contains up to 14 to 18 treatments, which is great to know.
Perfect Whitening says it’s “The best revolutionary formula for a whiter, perfect smile. A 100% safe and optimal dental strength for accelerated results without long term damage to teeth, enamel, and gum”.
My Luxe kit came with the following items:
- 30mL of dental strength hybrid 2in1 peroxide teeth whitening gel formula
- 4x thermoforming mouth trays
- 1x Mineralising/ Desensitisation Gel
- Extreme Perfectwhite 6LEDs Accelerator Light
- Bonus whitening pen (we will review this separately)
- Professional Instruction Guide’ with exclusive tips
- 2x Batteries included for the LED light
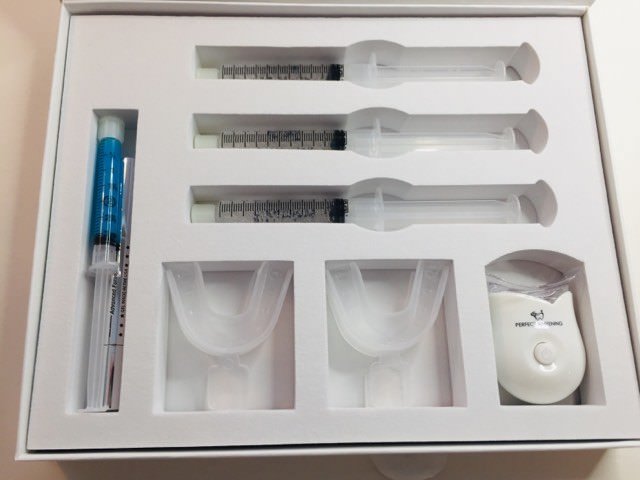
An above view look at the Perfect Whitening kit I received
Whitening Gel Ingredients
You find that the Perfect Whitening Luxe Kit has 8 ingredients that make up their whitening gel.
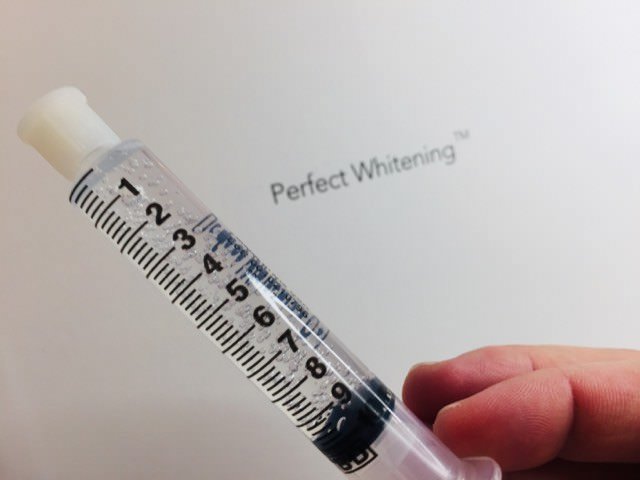
Holding one of the 3, 10ml gel syringes
In terms of the ingredients used, 8 is not the lowest on the market, nor the highest.
The ingredients are as follows:
- Propylene
- Glycol
- Glycerine
- 18% Carbamide Peroxide
- Carbopol
- Peppermint oil
- Trolamine
- Sucralose
18% Carbamide Peroxide is the strongest allowed to be sold through retail channels.
Some other whitening kits on the market use 6 Hydrogen Peroxide.
These two whitening agents are the same strength so don’t worry about the different % amounts.
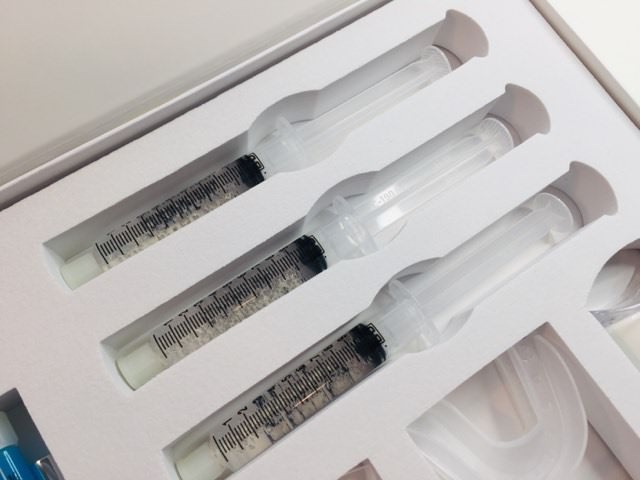
The whitening gel syringes neatly stored in the kit
In the kit, you will also get a syringe of mineralizing/ desensitization gel.
You can use this formula after your whitening treatment and /or if you have sensitivity issues.
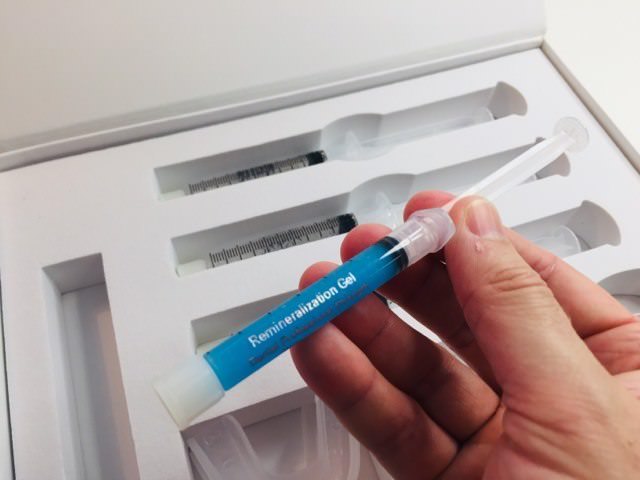
The Remineralisation/desensitizing gel which came in the Luxe kit
This desensitising gel has a few more ingredients than the whitening gel, 17 to be exact. They are as follows:
- Glycerine
- Propylene
- Glycol
- Purified water
- Xylitol
- Calcium Pyrophosphate
- Trolamine
- Xanthan Gum
- Peppermint Oil
- Carbopol
- Benzylalcohol
- Lactic Acid
- Potassium Nitrate
- Sucralose
- Sodium Fluoride
- Cellulose CMC
- Blue Shade Liquid
Whitening Gel Instructions
The whitening process can be completed in a couple of simple steps that Perfect Whitening has laid out. I will recap these below and try to simplify it where I can.
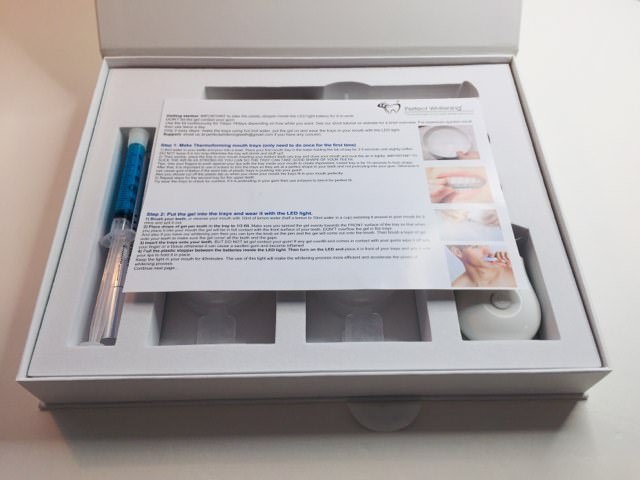
The instructions are just inside the kit
Step 1 – Mould Your Tray
This is reasonably straightforward and doesn’t take too long to get it sorted. Once you mould your mouth trays you are set and ready to go.
So, pour water to a pot and bring it to the boil. To fast track this stage you can use a kettle first.
Place your mouth tray in the water (recommend turning off the stove and let the water rest a short moment).
Hold onto the tab for 3 to 5 seconds or until it’s slightly softened. They say don’t leave it in the water for too long as the mouth tray could deform and lose its shape permanently.
Place the mouth tray into your bottom teeth and close your mouth. Make sure to suck out any air and salvia. This will help with the mould process.
You can also use your fingers to push against your teeth so that the mouth tray forms nicely. Give it at least 10 seconds to complete this step.
Once finished, repeat it for your top teeth.
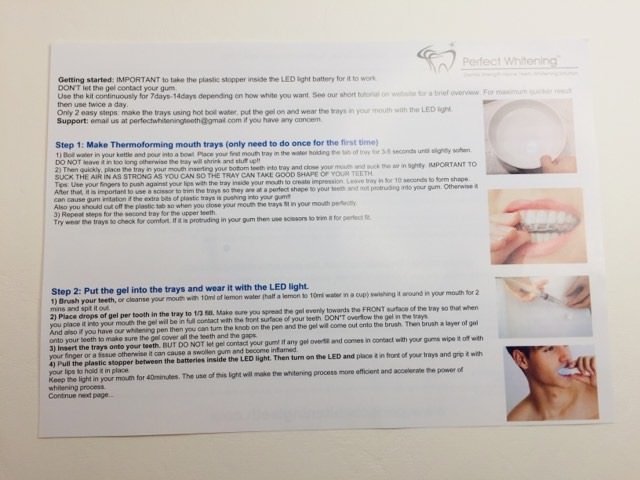
Take your time to process the information offered, there is plenty of it
When both trays are moulded, check both trays fit in well and are comfortable.
You can also use a pair of scissors to trim areas on the mouth tray that are poking out a little. A perfect fit is advised as this will ensure the gel doesn’t reach your gums and cause possible irritation.
Step 2 – Whitening Process
This second step is split into 4 sections. I’m not sure why they didn’t just say there are 7 simple steps! But anyway here they are:
#1 Brush Your Teeth
They recommend brushing your teeth before starting this whitening treatment.
Brushing your teeth before whitening your teeth is a good recommendation
They also offer a unique cleaning routine as well.
You can opt to cleanse your mouth with 10ml of lemon water (half a lemon to 10ml water in a cup) swishing it around in your mouth for 2 mins and spit it out (not sure about this).
After that, try to wear the trays first without any gel to check for comfort. Then properly clean the trays, making sure they are dry before applying the whitening gel.
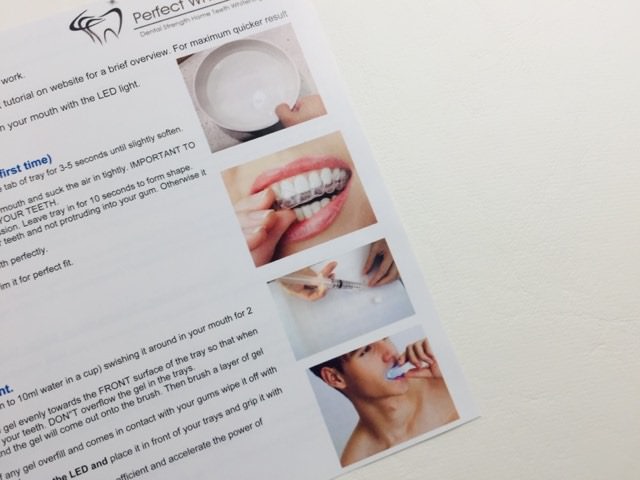
Images used on the instruction sheet do help
#2 Applying Gel
Put the gel into your mouth trays by placing drops of gel per tooth. Try to aim for the front surface of your mouth tray.
Doing this will greatly help the connection between the whitening gel and the front areas of your teeth where you are wanting to whiten.
#3 Insert the Mouth Trays
This step can be a little tricky. Try not to let the whitening gel reach over onto your gums.
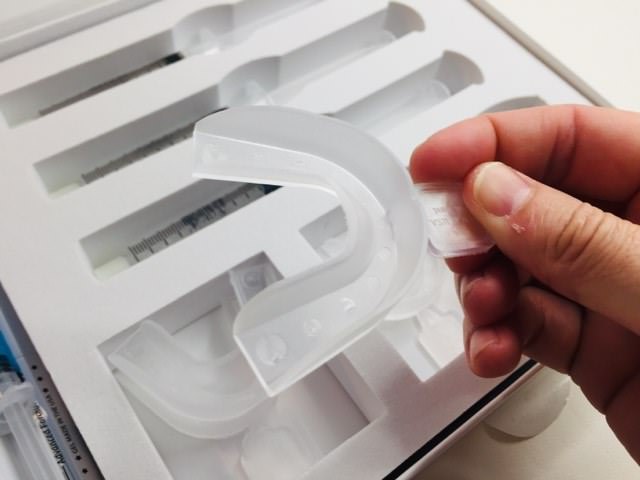
The mouth tray out of the box
Perfect Whitening offers this advice:
If any gel overfill and comes in contact with the gums, wipe it off with your finger or a tissue.
Perfect Whitening
Gum irritation and discolouration is a common occurrence which can lead to swollen and inflamed gums.
The trick here is to start off slow and ease your way into the whitening treatment.
Less is best when starting out, you can to understand your whitening product and build up to a move stronger application if desired.
#4 LED Light Ready!
Before operating the LED light, pull the plastic tab which is inside the battery housing at the back of the LED light. This will create a battery connection and allow the light to work.
Press the button and turn on the LED light. Place it in front of your trays and grip it with your lips to hold it in place.
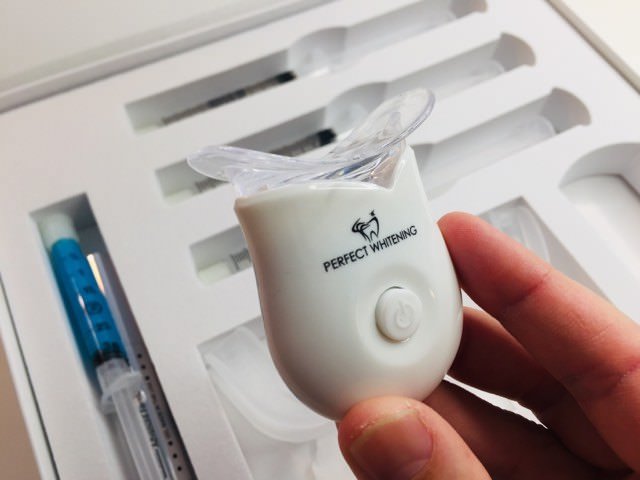
The Perfect Whitening LED light
Perfect Whitening mentions keeping the LED light in your mouth for 40 minutes to 1 hour.
The LED light works to increase efficiency and accelerate the whitening process.
Once you are finished, remove the LED light from your mouth and leave the gel trays in your mouth for another two hours.
If you really want to maximise the whitening potential, Perfect Whitening state you can sleep overnight with the tray inserted.
Remineralisation Gel Instructions
Perfect Whitening mentions that this remineralisation gel can be used if you are experiencing sensitivity or want to restore “minerals to strengthen stronger teeth enamel and resist against dental cavities”.
To start the remineralisation process, spread the blue gel evenly into the mouth trays you used for the whitening process. Make sure you wash them beforehand, clean and dry them accordingly.

The remineralisation gel syringe
Once you have an even line of remineralisation gel on your top and bottom mouth trays, insert into your mouth like you would do when whitening your teeth and leave for 30 mins – 1 hour.
When the time is up or you have decided to finish, take the trays out but don’t rinse or clean your mouth, this will help the overall process, mineralising your teeth overnight while you sleep.
Perfect Whitening recommends you do it every couple of nights until 3 gel syringes have been completed.
You can repeat the remineralisation step every 6 months when needed.
Tips For Perfect Whitening
So they have some tips that can help with certain issues that can arise when using whitening kits.
A lot of times when you use whitening kits, you’ll have quite a lot of saliva buildup. I know I did.
Perfect Whitening confirms that “excess salvia production can, unfortunately, slow the effectiveness of the whitening process”.
But they believe the trick to get around this is to use a cotton makeup removal pad. Okay?!
Here are 5 points that Perfect Whitening offer their customers in relation to salvia issues:
- After you got the gel in the tray and put it in your teeth, then get the cotton pad and wrap it around the trays and your inner gum, to block off the saliva from getting inside the trays.
- Try to prevent saliva from getting inside the tray and wash away the gel.
- After that, where the led lights sit in front, shining as normal. The cotton padding will hopefully protect the gel from getting wet.
- The led light wavelength intensity can pass through the cotton fibre to do the job.
- Several applications could be needed if you have a lot of salvia buildup before you see visible results.
Cautions
Perfect Whitening has a general disclaimer which outlines certain DO NOT USE IF guidelines. Below is a list of these:
- Pregnant/nursing
- Poor dental health (decayed teeth, exposed roots, gum disease, wear braces, recent oral surgery, jaw problems).
- At-home treatments do have some low risks involved and you should consult your dentist if you experience any problem.
- Some people may experience tooth sensitivity and gum irritation. If this is the case then stop for a few days or decrease the time of having your trays in your mouth.
Price and Value
This whitening kit is currently priced just under $90 Australian dollars.
In terms of value, the kit does have a lot of items assembled inside so yes, it’s reasonable value for money.
However, competition is fierce and there are plenty of whitening kits on offer at the moment that are below $80, some even just $60 with discount codes that present the same results for their customers.
At the moment, Perfect Whitening is offering a 20% discount site-wide and free express shipping to all Australians, 4-6 days turnaround.
The good news continues, currently, if you spend over $70 you get extra fast express shipping 2-3 days delivered.
Value for money just increased in my books.
Below is a video of a lady who tried and tests the Perfect Whitening Kit.
Overall
Perfect Whitening is definitely a whitening kit brand that you should check out if you are interested in whitening your teeth.
The luxe kit I ordered was filled with product and a decent about of whitening gel, 30mls to be exact which is great. Most are only around 9mls in total.
As mentioned in the Price and Value section above, there is a stack of competition in the Australian whitening kit market. Plenty to choose from if you are researching.
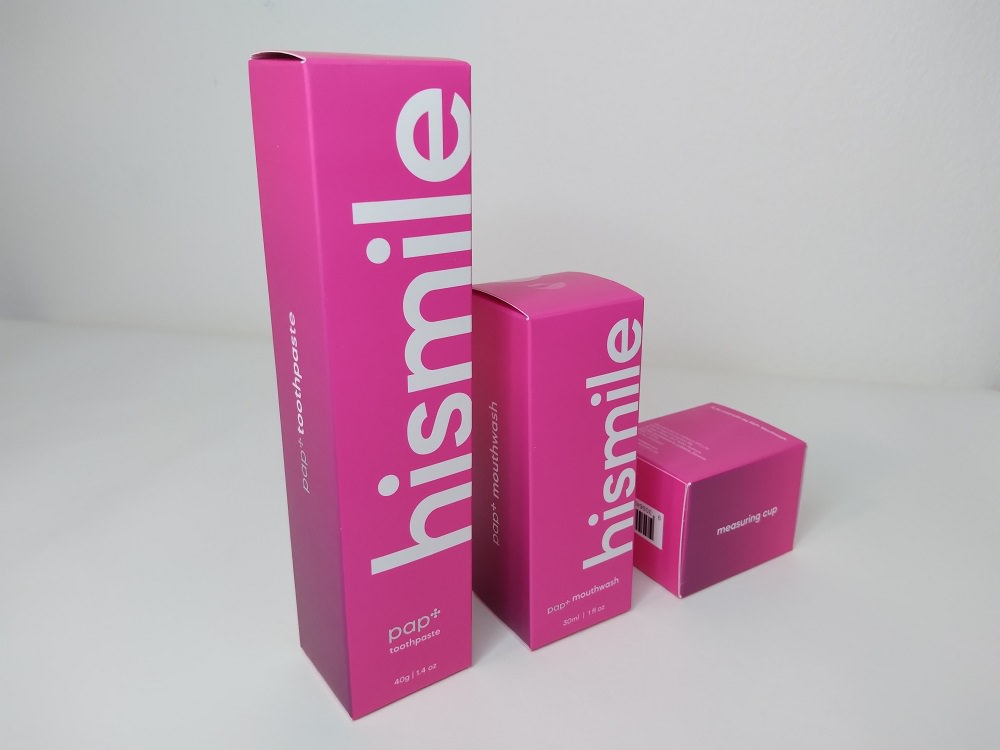
Yes, the mouth trays are a little old school and you have to mould them yourself which takes a little time but they work. Some even say better than the universal types offered by popular brands such as Hismile or Bondi Smile to name just a few.
Perfect Whitening I feel is a solid choice and should be considered if you are in the market to whiten your teeth.
At that 20% discounted rate, I feel it presents good value for money.
Have you tried a teeth whitening treatment before? What were your thoughts on it? Comment below
By Anthony Cade
Created at June 19, 2020, Updated at January 25, 2025